Saturday, October 20, 2012

DIY ENVELOPES


     I know this project has been done countless times, but I wanted to give it a try. It's a super simple project, but you all know how I love my personalized paper goods. Though, I'm not sure it needs instructions to go with it. Simply unfold an envelope you have lying around, trace it on a magazine page, cut, fold and glue! Easy peasy! You can also use cardstock, scrapbooking paper, wallpaper, fabric or newspaper! 

     If you don't happen to have an envelope lying around that you can use, here are a few links to various envelope templates I found online: TEMPLATE 1 | TEMPLATE 2 | TEMPLATE 3 | TEMPLATE 4


Happy Mailing! 
Jean. 

Friday, October 5, 2012

LA COUNTY FAIR


     I'm so late on this post, ha! But last weekend was a trip down to the LA County Fair! I went with my good friend, Em, and a club on campus. It was so incredibly hot, but the fair was a ton of fun. 


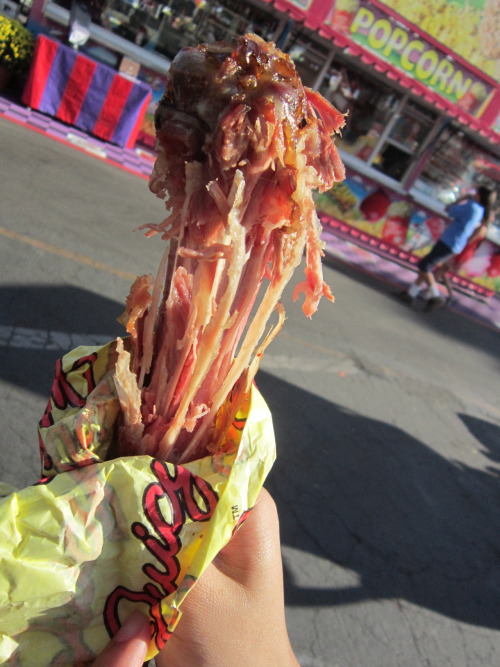
     The first thing we did was go half-sies on one of these giant turkey legs. I've never had one before and while I'm still not a huge fan of turkey, I can happily check that one off my list of things to eat. It took us quite a while to get through and I don't think I'll be eating turkey again for a while. hahaha. 1 point for me, 0 for Turkey!  Though, in all fairness, Em ate most of it.


      We went into the fair with four goals to achieve by the end of the day.

1. EAT SOMETHING FRIED. Because what kind of fair would it be without trying something strangely deep-fried?


     Ta-dah! We opted for fried kool-aid, which I know sounds rather disgusting. Yet nonetheless it was surprisingly decent...think of extremely chewy dough-nut holes with a tangy fruity kick. Our second and third goals were to get a photobooth strip and snap a photo of the both of us together. We're both usually off on our own, taking pictures of random things, so we never get one together. We did get a photo together, though we didn't get a chance to stop by in a photobooth. Success nonetheless! 


     There were so many animals at the fair! I couldn't get a decent picture of any of them aside from the budweiser horses. Sadness. I need a better camera eventually! 


     I left with a couple straws of fresh flavored honey! Four for only a buck, how could I not? Flavors ranged from original clover to apple, grape or even pina colada. Of the ones I picked out, I've only tried the blueberry so far. Boy, is that stuff super sweet! 

(The sun setting at the horse show.)


     Stopped by this little stand so a friend could pick up some roasted corn! So many shops of food! Honestly, if it wasn't all so expensive, I would have bought it all. 


     As bustling as the fair had been in the afternoon, it really came to life once the sun started to set. All the lights flipped on and the crowds came rushing in. And the temperature finally dropped, thank goodness!

(Sorry for bad picture quality, snapped it while I was walking)

    4. GET SOMETHING COLD. Our last goal was to get some sort of a frozen dessert or treat since there were so many ice cream/gelato/shaved ice stands all over the fair. Though in the end, we opted for stopping by Half & Half for some milk tea and boba on the way home. That technically counts, right?


      Coincidentally, Hai ended up going to the fair  that night too, an hour after I left back home. What a copy cat! Kidding. Kidding. Anyways, it was so nice to get out of my cubicle dorm room and go somewhere. Any of you head to the fair this summer??
Jean.

Thursday, September 27, 2012

BACK TO SCHOOL


Aghhhh!! It's finally here! And I'm not saying that in an overly eager, excited kind of way. I say that in a booo, I've been dreading it all summer kind of way. Nonetheless, the first day of school has come and gone, leaving me with ten more weeks of books and exams! Whoop! Who said this would be the time of my life??! Kidding, kidding. College really has been good to me thus far. Plus, the view from my room is gorgeous! My room oversees all of campus and the surrounding city, which lights up and glows at night. Studying's not so bad like this. Anyway, with the new year starting, I'm hoping to set a few habits in and maybe try a new thing or two!

  1. Keep it clean! Or at the very least, my bed. I'm a whirlwind of chaos, but I'm hoping I can keep things somewhat organized this year. 
  2. Work-out 2-3 times a week. I realize this will be tough when finals roll around, but being healthy and in shape keeps me happy. That's the numero uno. 
  3. Study Every Day!! I took way too many days entirely off last year and I regretted every one of them. 
  4. Stay creative. As busy as I gets, I'm trying to make sure I always have a bit of time for the things that keep me sane. So if I can squeeze in a quick drawing, painting, craft or whatnot, I'll be a happy camper! 


Just one more picture of my view before I go, just because it looks so cool. :) G'luck to everyone else out there who started classes!
Jean.

Wednesday, September 26, 2012

THE LAZY-SCRAPBOOK ALBUM


Here's what you need: 
1. A sketchbook. I recommend spiral-bound hardcovers, so your photos don't bend.
2. Glue or a gluestick. Gluesticks may not hold for long, so choose a good brand and apply liberally. 
3. Scissors! For trimming or cutting out photos
4. Photos! :) Of course.

(Page from our beach trip this past spring)

     Arrange your photos however you'd like, glue them down and scribble in captions and notes along the white spaces left. If the pages of your sketchbook are thinner, make sure your pen doesn't bleed through! If you still want more of a scrapbook feel, you can easily add in stickers and decorations around the photos. I prefer leaving them blank, so it doesn't distract from the images themselves. 

(I'm a big fan of documenting food on our trips.) 

     And that's it! It's an extremely fast process and can also serve as a photojournal, depending on how much you jot in along the edges. It's much less intimidating of a project to take on then a full-fledged scrapbook, but still lets you store and keep all your favorite memories. :) Mine's exploding with pages! 
Jean. 

Thursday, September 20, 2012

STITCH YOUR OWN STATIONERY!


     I have a confession to make. I'm a paper addict! It's true. Journals, stationery, books...I hoard them like crazy. Yet at the same time, I'm incredibly stingy and I never want to shell out my tiny bit of money for packs of generic stationery. Instead, I prefer fancying up regular paper with my own little details! It's really very simple to do. This particular walkthrough is for stitching up your own stationery with whatever cutesy headers or decals you'd like! 


Here's what you'll need:
1. Paper. Any type will work, though from what I've tried, heavier paper will hold up better with all the poking and pulling. I had way more knots and tangling when working with lighter papers. 
2. Push-pin. 
3. Needle and Thread. Use as many colors as you'd like, make sure your needle isn't too much smaller than the pushpin holes, or the thread will just slide right on through. Embroidery floss would also work really well here. I just doubled my thread since all my embroidery floss is packed somewhere in the garage. 
4. Cork-board (optional). Just makes it easier to poke into. Cardboard, carpet, foam...anything else will do. 


     First off, trace out your design very lightly with a pencil. Then, place your paper on the cork-board and use the push-pin to poke out your design. This makes sewing through easier and reduces the amount of wrinkles you would get otherwise. 


     Thread your needle and get sewing! Make sure to start so that the knot of your thread is on the back of the page. Keeping your letters or design connected in a single line is faster, since you don't have to stop and rethread/knot multiple times. 


     Continue stitching through until your design is complete! Be wary of your thread tangling and knotting along the way! That'll ruin your work pretty quickly and doesn't look nearly as nice. Feel free to add more along the page. I'm thinking of stitching in lines to write on across the whole thing. Off to make more! Hope you enjoyed!
Jean.


Wednesday, September 19, 2012

A GREEN THUMB


     I'm pretty sure I don't have one, sadly. My parents, on the other hand, seem to have entirely green hands. Coming home means heaps and heaps of every kind of fruit possible. We have fruit trees literally every five feet in our backyard. I went around the other day and snapped some photos just for kicks! From left to right: dragon fruit, soursop, tangerines, grapefruit, pears and persimmons! This isn't all of it, either! We have nectarines, jujubes, avocados, oranges, lemons, longan fruit, chilies and a whole mini-garden of herbs.  I'm going to miss all these yummy goods once I move back out this weekend. Back to dining hall apples and bananas for me! 
Jean.

Saturday, September 15, 2012

VINTAGE BOOK POSTCARDS


     A couple of months ago, before heading back home for summer, I went on a miniature thrift adventure! My favorite find from that day was this old vintage encyclopedia printed back in the 50s! I love old hardcover books! I know a lot of people find it blasphemous to cut up and ruin an old book, but there's honestly so much more use in its pages! Though, had it not been an encyclopedia, I most likely would have read through the whole thing before snipping it up. So anyways, here's the first project I cooked up using these old pages: vintage postcards! 


Here's what you'll need:
1. Cardstock! In any color you want. I stuck with a tan to go with the worn look of the pages.
2. A vintage book to cut up! Or any other magazine, newspaper, book with interesting images.
3. Glue or gluestick
4. A postcard to trace (optional). You can always simply cut out a rectangle within regulation size, I just wanted the rounded corners of the postcards I have. 


     First off, trace the postcard onto a piece of cardstock. Or if you're forgoing the postcard, simply cut out the shape you want. Then, rip out the desired page. Place your cutout cardstock over the photo/area you want, trace and cut!
     If you're using a gluestick: apply liberally on the cardstock, place book page down, then using a pencil or pen, rub down across the entire card. This causes the glue to really mesh into the grain of the paper. It's an easy trick my art teacher taught me back in highschool to get the best hold out of your gluestick, which is a must if you're planning on mailing off the postcard. If instead you're opting for white liquid glue, do this to avoid wrinkles: apply just a bit of glue across cardstock. Then, using your finger or a paint brush, smear the glue out from the center to the edges. Once you've evenly spread the glue, place the page down, wrinkle-free!


     These particular postcards were for my boyfriend, who's got a big interest in the WWII era. So I opted for photos of Eisenhower and the landing on Normandy. I'm planning on making a whole lot more of these later on, with all sorts of different photos! If you do make these, we'd love to see! :)
Have fun!
Jean.