Showing posts with label art. Show all posts

Wednesday, September 26, 2012

THE LAZY-SCRAPBOOK ALBUM


Here's what you need: 
1. A sketchbook. I recommend spiral-bound hardcovers, so your photos don't bend.
2. Glue or a gluestick. Gluesticks may not hold for long, so choose a good brand and apply liberally. 
3. Scissors! For trimming or cutting out photos
4. Photos! :) Of course.

(Page from our beach trip this past spring)

     Arrange your photos however you'd like, glue them down and scribble in captions and notes along the white spaces left. If the pages of your sketchbook are thinner, make sure your pen doesn't bleed through! If you still want more of a scrapbook feel, you can easily add in stickers and decorations around the photos. I prefer leaving them blank, so it doesn't distract from the images themselves. 

(I'm a big fan of documenting food on our trips.) 

     And that's it! It's an extremely fast process and can also serve as a photojournal, depending on how much you jot in along the edges. It's much less intimidating of a project to take on then a full-fledged scrapbook, but still lets you store and keep all your favorite memories. :) Mine's exploding with pages! 
Jean. 

Saturday, September 15, 2012

VINTAGE BOOK POSTCARDS


     A couple of months ago, before heading back home for summer, I went on a miniature thrift adventure! My favorite find from that day was this old vintage encyclopedia printed back in the 50s! I love old hardcover books! I know a lot of people find it blasphemous to cut up and ruin an old book, but there's honestly so much more use in its pages! Though, had it not been an encyclopedia, I most likely would have read through the whole thing before snipping it up. So anyways, here's the first project I cooked up using these old pages: vintage postcards! 


Here's what you'll need:
1. Cardstock! In any color you want. I stuck with a tan to go with the worn look of the pages.
2. A vintage book to cut up! Or any other magazine, newspaper, book with interesting images.
3. Glue or gluestick
4. A postcard to trace (optional). You can always simply cut out a rectangle within regulation size, I just wanted the rounded corners of the postcards I have. 


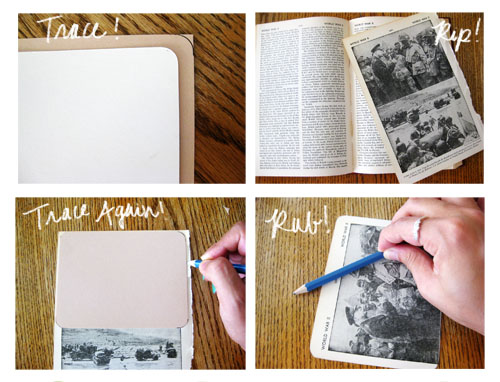
     First off, trace the postcard onto a piece of cardstock. Or if you're forgoing the postcard, simply cut out the shape you want. Then, rip out the desired page. Place your cutout cardstock over the photo/area you want, trace and cut!
     If you're using a gluestick: apply liberally on the cardstock, place book page down, then using a pencil or pen, rub down across the entire card. This causes the glue to really mesh into the grain of the paper. It's an easy trick my art teacher taught me back in highschool to get the best hold out of your gluestick, which is a must if you're planning on mailing off the postcard. If instead you're opting for white liquid glue, do this to avoid wrinkles: apply just a bit of glue across cardstock. Then, using your finger or a paint brush, smear the glue out from the center to the edges. Once you've evenly spread the glue, place the page down, wrinkle-free!


     These particular postcards were for my boyfriend, who's got a big interest in the WWII era. So I opted for photos of Eisenhower and the landing on Normandy. I'm planning on making a whole lot more of these later on, with all sorts of different photos! If you do make these, we'd love to see! :)
Have fun!
Jean.